Thursday, August 2, 2012

goatsbeard

Those of you, who follow the Olympics in London might have stumbled upon this:
Source: Wikipedia
It's the Royal coat of arms of the United_Kingdom, for example decorating the Buckingham palaces' gate. And has been in many TV images covering the present event.
And yes, you looked right. The righthand horse carries a horn on his head. Even more: From the pose (front legs in the air) it's the same horse as the one in front of Hannover's university. Right: No surprise. From the 17th century on British kings have been from the House of Hannover and for a period also were kings of Hannover in personal union. Even though they changed their name, the royal family are decedents from this hannoveranian line.
The must have thought: saxon steed, cool but what would be cooler? Indeed, let's make it a unicorn.

Interestingly there's controversial information on the internet. The German wikipedia entry on the horse claims it's connection to the coat of arms, whereas the english sites say the horse is scottish. So no connection to the saxon steed. From 1714-1837 the coat of arm carried hannover's white horse, but without the unicorn. This feature has since been removed, adding the unicorn.
We're no expert on heraldry but above unicorn definitely seems to be influenced by the saxon steed.

But if we were, we might have noticed the split hooves and the goatsbeard. A feature introduced to unicorns from greek mythology (Next time a horn alone won't do). Additionally there is this crown shaped lead, the unicorn is leashed to the ground by. No one captures a unicorn, except for the Scottish.  James I. in early 16th century introduced the unicorn to his coat of arms, as king of England with scottish origin. This version was the base version of the one pictured above, reintroduced by Queen Victoria. So no saxonian unicorn. Sorry.

Further observation:
The two lions guarding our universities gate are definitly relatives of those two pictured above. Only difference seem that hannover's versions are proud of their manes, whereas the coat of arms ones are wearing crowns, supposedly to cover some bald spots. Poor things.

Saturday, July 28, 2012

Weather report

Looking back at the last weeks, the most striking observation is: Now that the unicorn is gone, the summer has returned. Yeah!!!
Seriously. The day the horn was gone, the sun had returned. But was that really the the case or just false perception? So let's take a look at the data. We grabbed some  freemeteo.com weather data from the 2009 on and extracted as much information possible.
For visualization, we choose 3 key figures:
  1. Sunhours per day
  2. maximum Temperature
  3. rainfall per day
Compared to the 2009-2011 mean values, we had 41.5% less sunhours and 150% times the rainfall. The temperature was on average 3K colder. That looks quite impressive, but as always statistics lie!

The dotted line shows the 3 years mean value for the last three years. Shaded area above marks the maximum value for those years, the darker area below the mean-line are minimum value for the period.As we only have three years worth of data, that measure is more conclusive than a plain standard deviation. Big percentage denotes the difference of 2012's period compared to 2009-2011.
Red and Green bars denote the difference of 2012's value to the 3 years mean. Green is better, red is worse, so lot's of red strengthens our point.

Sunhours

Three year mean is 12±4.5h (theoretical cap is ~15h, cause the sun doesn't shine longer) so standard deviation is not the best description, as the distribution is definitely not standard normal.
Low values, near zero (less than 2h) direct sun occur four times over the period which is as often as in the 2009-2011 timeframe, thus ~3 times more often than expected. In addition 9 values are below the 3years minimum and only 3 above the mean.
Before the horn was up, the days were pretty normal (within the 3 years hull, near the mean), but after unicorniversity sunhours skyrocketed well above the mean and mostly outside the 3 years maximum values. 

Temperature

Maximum temperature of the day is lower than the mean for the whole month but the effect before and after unicorniversity are virtually nonexistent.  This might be the case, as temperature is somewhat dependent on the other effects and has a certain delay, as heating up and cooling down the surface takes some time. We call secondary effect.

Rainfall

Apart from the total amount of rain, lets look at the number of rainy days. The 3 year mean shows us, that apart from two days, for every day in the July 4 - July 19 period (approximately 2 weeks or half of the month), there was one year, with no rainfall for that day. Compared to that every day (but one) period in 2012, it's quite striking. So let's have a look at the individual years:
2009: 12 rainy days, 2010: 5 days, 2010: 10 days, on average 9±3 days, which means 15 days for 2012 is well outside the 1-sigma range. In addition, the DWD reports 9.9 rainy days for the whole month (average from '71 to 2000). 15 rainy days in half the time is definitely worse.
Looking at the distribution of rain-amount (it's not mm/m^2 but an arbitrary scale), 7 days are even above the 3 year's maximum amount for the respective day and only one is below the day's mean. Without further quantification that's pretty wet.
After we removed the horn: No more rain for a stable 5 days minimum. With constant raining before, this is quite strong.

Conclusion

Unicorns lead to rain, but even more: Removing them get's the summer back! Next time we try to collect more data, to prove this conjecture. Scientific work. First day of unicorniversity, which had pretty good weather, better than the 3years mean for that day, is regarded as adaption time. The asymmetry towards the end has to be studied further, but with a lot more sun and zero rain from July 20 on, the absence of the unicorn is obvious.
A working model, understanding this miraculous link, could be based on the connection between unicorns and rainbows. We might get into that later.

Friday, July 20, 2012

Funny story

When we took down the horn yesterday (for all who liked it, sorry for that), the security guy came by and told us, that whatever we were doing, we had to put it back up afterwards. We had to convince him, that we were the original creators.


If you've good ideas for future unicorniversity actions, feel free to leave a comment.
All your condolences are good here as well.
There are still a few posts on the way.

Thursday, July 19, 2012

Impressions 2

Everything really looked nicer, when it was warmer outside. Really considering take in gloves right now. The other day, when it was raining cats and dogs:
And again more shades of blue. Tried to match the blog's background color.

Merging

Remember the discussion about where to place the horn? It turned out to be an easy decision on the virtual 3D model. Put it on, spin it around, rotate a little, move back and forth - Done.
In reality aligning the horn to the platform was one of the hardest tasks. Only then we discovered the true meaning of degrees of freedom. It had to be perfectly in line with the vertical symmetry-axis of the head. And most importantly we had to get the angle right. Too much swept back and the horn would lean backwards, looking totally dumb. Too much to the front - the horse would starve. The positioning was a no brainer compared to rotational alignment.
As you can see: The magic arm proved very handy again, holding the horn in position, while the modelhead + platform was movable. Nevertheless it took us at least two hours, realigning everything from scratch multiple times, measuring angles, comparing with the simulation and digital imagery.


Laminating the junction didn't even take half that long. Three to four layers of 300 and 160g/m^2 covered with the usual finer 3 cm wide fabric tape, with no moulding, worked way better, than we had expected. A little electric tape was added to get the edges flat.

Next: Cleaning edges, filling, sanding the junction. No big deal. We decided to paint the lowest fifth of the horn the same way we did with the platform: Green with aging. It's supposed to look like the white horn is bursting out of it's bronze cover.
For weather proofing, a sprayed transparent epoxy-based layer was added.
This is the final result:

Unicorn Junction 360 on Vimeo.

Everything in place. We were good to go.

Painting the horn

Horn

Completion of the horn was nearly finished, except for the paint job. We decided to color it light ivory, as that's what nature must have had in mind. And it definitely looked more natural than bright white. We know for sure, as the laminate was painted with a thick white primer to get a smooth finish. It didn't look natural.
The primer really covered the texture of the glassfabric very well, but was still too thin to be sanded to get every etch out. We decided to drop the perfection.,as some 8m above ground, no one would notice anyway.
Next picture shows the freshly painted horn being presented to the world for the first time. Actually we had to put it out, because the primer smelled like hell.
As a last step, we added the phosphorescent pigment mixed in epoxy resin into the helical groves. Inside the rather dark room, the effect was quite cool. But that was a different story.


mounting platform

The mounting platform was a different story. We wanted it to perfectly blend in in it's new environment. It should be virtually invisible. Only apparent, if you look carefully. We had to get it's color match the greenish, weather worn bronze.
Did you know, that green patina nowadays is not common for new bronze or cooper objects exposed to weather? Acid rain is not what it used to be any more. Over a hundred years ago, when the statue was first on display it was a sweet bronze brown, as you can see the picture here.
Focus! As weather proof colors weren't available in our price range and we didn't have experience mixing them, we stayed with ordinary acrylic color. Some green, blue, white and black was all we needed. Most of the mixing was done right in place on the target.
In fact, we had a session in sight of the statue to get the color and aging effects right. Some black in the grooves, some more white and blue at the edges. As you can see we spared the part, where the horn would be attached later. The only minor bump is, that due to different reflection characteristics of the actual statue and the platform, the colors didn't match in both sunny and cloudy conditions. It was only accurate if the amount of ambient light was high, as you might remember from the Day 1 discussion.

Tuesday, July 17, 2012

Planning Part 2

What concerned us most was, that the whole party was going to take place some 8 meters up in the air.
From our 3D scanning sessions, we knew: You don't simply walk through Hanover carrying a long ladder. Ok, it wasn't a ladder then, but the 3 meter kinect scanning rig. And even retracted that looked damn strange. And who would believe, that you weren't out to spy in 1st and 2nd floor windows. The reach of a 8m ladder would be even harder to explain. Ok, that sounds like we were a bunch of pussies, but careful planning brings up a lot of things.

By the way. A 3m ladder might have worked, if we'd placed it directly on the base beneath the statue. But securing it would have been a nightmare. Safety first.

So it all comes down to logistics. By the way, a three section telescopic ladder with 10m reach is easy to get in Hannover, if you've found the right rental service. Getting it where you'll be using it is somewhat harder, because at 4m dry, no car can handle it. Even a roof rack wouldn't have helped much. We went for a Mercedes Sprinter, long wheelbase. Yes, that's right. We rented a transporter to rent a ladder. This might be the weakest part in our endeavor to stay unknown. Some pain detective work could definitely turn up our identity. And yes, parking a big-ass white transporter, at the main parking lot at the university, at night, feels a lot like Captain Obvious.
Good for us that there were so many drunk people around that night, we felt way safer.

Sad story

The sad story why the unicorn doesn't glow in the dark

As we did't want to do it sparkling way, but aimed for an evolutionary correct unicorn, we thought it might look too ordinary. Why not let it glow in the dark? One might even come up with some explanation for that selection factor apart from secondary sexual characteristics. Even though we have to admit that the Peafowl too is some kind of magical creature.
Options
  1. A single heatbulb at the top. Retro! But hight power...
  2. LED lighting. Still had to power it. In addition the horn isn't a gadget. Otherwise we'd had to add bluetooth.
  3. A Laser. Hannover would have been proud. In fact, next time: we only put up a laser pointing upwards. Horse at day, magical (depending on HeNe, Argon, doubled Nd:YAG, ...) creature at night.
  4. Chemical reaction as in glow sticks. Would only work for a single night.
  5. Fluorescent color pigment. Ok. we'd have to install a UV lightsource somewhere.
  6. Phosphorescent color pigment.
Last is our winner. Sunlight populates an exited state that is forbidden to decay to the ground state. But as quantum mechanics is awesome: Electrons can tunnel to the ground state, with a huge half life of course.
This way the emission of light is delayed for hours. As with all probabilistic decaying things, the emitted light intensity is proportional to exp(-t).

So much for the theory. We applied greenish phosphorescent pigment to parts of the horn and the effect was quite stunning. After some time in the sun, the glowing was strongly visible for some hours after sundown inside the room. Held up against the sky outside the window, the effect was still visible.

From earlier investigations we knew, that the space in front of the university had quite a few light sources. And as the main building's walls are lit the background would be quite bright. That's why our biggest concern (apart from not getting caught installing the horn and the platform not fitting the head) was, that the glowing wouldn't be visible at night.

Sad part, as you might have already noticed is: Glow is not visible.

Investigation

Obvious reason: The environment is too bright. If the unicorn was in a dark forest, as they used to be, no problem.
So, let's get a little deeper into that. We'll discuss two possibilities
  1. The faint glow is simply not bright enough
  2. The decay rate of the effect is faster, than the rate the outside light reduces after sundown
After installing the horn, we flashed it with a DSLR flash. From earlier test we knew, that the glow from that was about as bright as from direct sunlight exposure. In the following picture one can clearly see a greenish glow. It seems that intensity of the light emission is not the issue.

Next: Decay rate. In the following we're going to compare brightness measurements from image sequences we've taken.
The Day1 time-lapse delivers the sky brightness around sundown. Images were taken at ISO400, f/4 and the sky was scaled to 18% grey for comparison. The above image (taken at ISO500, f/3.5) delivers a reference value for the glow's intensity after exposure to light equivalent to direct sun exposure.
In addition we directly measured the phosphorescent pigment. Setup was the following: We took digital images in 30s interval and let the camera's meter measure the glow at 18% grey. ISO200, f/2, which is half the sensitivity as with the day1 images, but 4 times the light through the lens. We compared the resulting exposure times of the images scaled by the mean brightness distribution over the glow.
We plotted both intensities scaled to match in a logarithmic plot to base 2. Every increase by 1 on the y-axis represents a doubling in brightness.
Interestingly the sky brightness went down exponentially (as you can tell from the quite linear plot), the glow's intensity didn't follow the predicted law at all! Only for the decay starting at 10 minutes of the last exposure, one could guess a linear functional relation in the logarithmic plot.
Even though the slew rate for the sky is higher, in other words: The sky get's dark faster than the glow, the ~7 octaves signal ratio (when the glow's decay becomes linear), are way to much for the effect to ever be visible. After ~100 minutes from sundown, the sky's brightness didn't decrease much further, but glow was still > 4 times fainter ( ~2 octaves signal to signal ratio).

If some of you have observed the glow despite this physically correct examination, magic happens. Feel free to leave a comment.

Next, we'll Next time we go for the bluetooth option.

Saturday, July 14, 2012

Mounting platform

outline

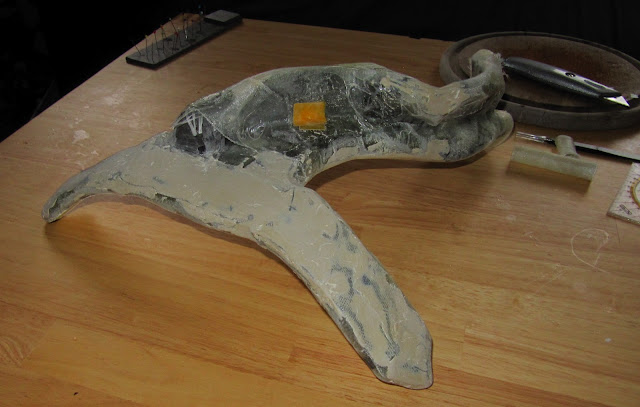
The mounting platform's foam core was build from XPS leftovers from building the model head. We didn't use fancy CAD to design this part but fitted it directly onto the model.
The process split up into three phases:
  1. Forehead-part, supplying forward stability
  2. Aft section, trying to use the hairs as a support, sideway stability
  3. Middle section, merges the two, location of the horn
This decision was more work in progress based, than careful planning. Smaller workloads were easier to handle and especially easier to remove from the mold.

forehead

We cut out and clued together small pieces of XPS, approximately 4 cm wide and build two layers adding up to approx. 1cm hight. Tight fit was a concern, but one hat to plan with the added millimeters the laminat would take.
A base layer of 300g/cm^2 beneath and on to of the core, a layer of lighter fabric covering it and the 3cm wide tape along the edges. We used needles to pull the fine-meshed tape over the foam-core edge to ensure a nice edge. Otherwise the tape wouldn't have followed the topology. Again the black tape from the core is well visible beneath the now transparent laminate.
We went the standard releasing agent way that would have ensured a clean separation from the mould, but that didn't work to our satisfaction. And we partly ripped of the filler from the model, as can be seen  in later picture.

aft section

For a more precise fit, we got back to the paper patterns used to cut the slices for the head and build 'negatives' for the region of interest along the hair.
Those slices were stacked, just as we did with the model head. But for optimized fit to the model, we smoothed the surface by cutting away the staircases.
As the releasing agent didn't work out for us, cling wrap was the weapon of choice. We added thin foam material between the model and the wrap to more evenly convey force from the model to the XPS-foam core. This way the laminate would lie flat on the core and leave some room between model and the structure after removing the foam material.
To press the core against the model we turned the window bench into a workbench. Outfitting it with sticks exerting pressure on the foam core. This was a work in progress operation, we hadn't planned out the details, we had not tried this before. This explains the electro tape to join the bolts. It worked for us.

The structure follows the hair in a big 'C' shape, but at the base of the hair the edge is almost straight, creating quite some overlap, that could help keep the platform in place.
And again from a different angle. As you can see, on the side facing away from the hair the fabric is sticking out. Bur our main interest here was to get the hair-facing side right.

In a last step we cut all laminate on the outside, that hung over the edges or didn't follow the cores geometry. See next picture.

middle section

The junction was prepared from XPS agin. Technique used was roughly cutting out parts of the estimated size, glue them together and afterwards shape in place with a sharp knife. We were a little tired of precision cutting a lot of pieces, as we had done with the aft section, so the slices are arranged along the axis.
This was the result: New foam core in the middle section and cut laminate-edges on the side of the aft section facing towards us.
Lamination was quite simple 2 base layers 300g/cm^2 covered with the lighter, finer fabric to allow better control of the resulting surface.
We also covered the outside of the aft-section where the foam core was still visible. Nothing fancy there. For increased and more even pressure, we added water bags, in the hope of getting a clean finish on surfaces not facing the mould.

This is the result after a quick filling and sanding run. To strap the platform to the head, we outfitted it with a hole for the rubber band to go through. For additional stability in this area, the walls of the hole are strengthened by outfitting it with a glass-reinforced tube we had laminated before. The yellow tape covers this tube, as it's glued in.
And finally in the context of the model Head. If one paced the aft at the base of the ear and then carefully slided the front-part over forehead, no force was needed. The platform fitted very well and the only direction of free movement was away from the hair, towards the viewer. All other directions were prohibited.
Sorry for the lengthy post, but we think that this was the key moment in the whole process. Without the mounting platform there wouldn't be a unicorn at our university.

Friday, July 13, 2012

Fact or fiction

Wandering the wide land, that's called google, we stumbled upon the following piece of information:

In 1686 the name giver of our institution, Gottfried Wilhelm Leibniz visitied a cave in the West Harz, where some years before bones had been discovered that were thought to belong to unicorns. Leibniz, who had an interest in paleontology, later included a drawing of this unicorn skeleton in his book Protagaea. One of the first paleontologic   reconstructions of an yet unobserved species.

The Wikipedia entry on the Einhornhöhle seem to take it's information from the caves official page, which unfortunately doesn't support direct links. Both pages also mention the influence of a certain Otto von Guericke who has been in correspondence with Leibniz over the unicorn and is stated by him as the source in Protagaea.

See for yourself in the translation of the original publication by Leibniz.
There also is a wired article on that matter. The bones that inspired the discovery seemed to belong to mammoths and other ice-age creatures. And it's stated that the horn only looked straight from a certain perspective.
The matter is still controversially discussed amongst historians, as you can see here: Leibniz on the Unicorn and Various Other Curiosities.

Based on the information available, we think it's an elaborated hoax. Leibniz must have known that the reconstruction was no unicorn and including a drawing in his serious book, fooling around with his readers, must have been hilarious. All by adding a horn to a yet existing thing. Simple as that.

Nevertheless, the connection between our university and unicorns is not completely arbitrary.
An observant citizen has collected all hannover's unicorns. Check out the link, there's much to learn.

Thursday, July 12, 2012

Reflections


The weather these days is not what it's supposed to be towards the end of lecture period. We might better have not spend time working on this project in may and june, when the sun was not such a rare resource.

Apart from that: The heat is on.

Model head - mounting platform

After finishing the raw XPS-slices model, it was filling and sanding time.
To this point the surface of the model resembled a staircase, but to laminate directly onto it, using the model as a mould, it had to be smoothed first. We used a polyester filler, setting-time about  5 minutes, which was rather short, but let one sand without waiting a whole day.

After sanding round 1, still pretty bumpy
After sanding round 2, getting better
After sanding round 3, starts to look smooth. Surface is still wet, as we sanded wet to avoid dust.

Of course there is a time-lapse video of the process. Ok - of the first two rounds filling. Sanding was quite dirty and took place outdoors...
5 second intervall


Filling the model time-lapse from Unicorniversity on Vimeo.


Positioning

Next thing to be evaluated is the position of the horn. This is a very crucial point in the whole design process, as it manly determines the look of the unicorn. Again 
Luckily we had the digital model to experiment with possible scenarios.

As 'A' is too far back, we decided to go with a solution between 'B' and 'C'. In addition 'A' would have been in close proximity to the hair and there might haven't been enough space for our mounting solution.


In this last picture everything has been prepared to start building the platform. The model has become a mold. As you can the surface is smooth and glossy after three rounds of sanding and the additional spray painted clear varnisch and ready to be used for further steps.
We've already marked and outlined the platform dimensions and the position of the horn. One can clearly see the shape of the hair, that will provide sideway stability. 


Tuesday, July 10, 2012

The Horn

Compared to the mounting platform building the horn was fairly easy. As already mentioned, we decided to go with fibre reinforced plastic on a foam core.

Foam core

The core was made from foam intended for thermal insolation of hot-water pipes in buildings. They were available in multiple diameters and wall thicknesses. And of course the are round.
Single problem that remained was that they didn't get thiner to one end, but we wanted a conical shape for the horn.


After some experimenting with the material (C) we decided to cut a dent along the axis an reglue the faces together in order to reduce the diameter (B). We went zigzag to increase the surface as you can see in the photos above and merged three sections of decreasing diameter to the final horn.
Next step: we cut two helical grooves about halfway through the hull (A). This is the earlier discussed resemblance to the narwhal's horn. (Ok, we didn't work in that order. The widest, longest part (A) was already cut and laminated, when we added the two shorter, thinner ones (B))

Lamiation

Don't expect some fancy high tech. We only hat limited experience and tools. So no molds, vacuum infusion or similar shenanigans.
We used a 160g/cm^2 twill fabric as a base layer, cut to cover the whole surface.

Then we added a 4cm wide strip of 250g/cm^2 roving tape that had sewed edges over each of the cut out grooves and forced them into the groove winding a thread around, which was attached to either ends of the construction. This way the fabric was forced to follow the topology of the underlying foam core.

And after adding the second strip and thread.

In the last step we impregnated the whole thing with epoxy resin until the fabric was fully transparent and one could see the core again.
Of course it would have been more optimal to lay the fabric wet on wet, but with this rather complex geometry this wasn't possible (tested that. won't try that again).
After the structure had cured, we added the upper half, laminated it and reinforced the junction.


We could put up a time-lapse video of that process. Leave a comment if interested.

Monday, July 9, 2012

digital - real world


As mentioned before Autodesk's 123D Make was used to get from 3D digial to the actual model. The software offers different material options. You can either simply stack slices in one direction or interlock them in as a kind of spaced stack in multiple directions, just as a skeleton.
Above image shows stacked, lower one interlocked example versions. The right column shows the cutting patterns.


We were only interested in the section including ears, eyes and frontal hair, 50x40x30 centimeters approximately. We added three holes that go through to whole model to simplify alignment of the slices.

As resolution is a concern we wanted a thin and light material with good cutting characteristics. The local DIY market turned up 5mm thick plates of Extruded polystyrene foam (XPS) normally for sound dampening under parquet flooring. We didn't regret this choice.

50cm at 0.5cm thickness means 100 slices. 123D Make returns a .pdf containing the patterns that can be printed out to scale. Each slice is numbered and has markings to Unfortunately one third of the slices didn't fit A3 paper and as A2 printing would have costed way to much, had to be stitched together after rough cutting.
Process was as follows:

  1. Rough cut slices, cut out the quadratic alignment mark
  2. Stitching together those that didn't fit a single A3 paper
  3. Arrange multiple slices on an XPS board
  4. Fix them with tape strips, most especially at the quadratic hole
  5. Precisely cut along the edges
  6. Cut out alignment marks
  7. Check edges and if necessary, clean them up
  8. Engrave the number of the slice
Took us about three weeks, but as progress was visible all the time, motivation wasn't an issue.


Building the Model Part 1 on Vimeo.

After finishing, the model was filled and sanded to get a smooth surface. But we'll get to that later.